If you’ve ever hung a fixture rated with “huge lumens” and then watched it disappear the moment you push it past mid-throw, you’re not alone. This is one of the most common frustrations I hear from lighting designers, rental techs, and church teams: the spec sheet says one thing, the room says another. You compare two fixtures, one claims higher lumens, but the other one clearly punches harder through haze. Or worse—you’re on a call with a supplier, they keep repeating “it’s very bright,” but you don’t quite know what to ask next to verify that claim.
This is exactly where understanding how candela and lumens behave in real-world stage conditions stops being theory and starts becoming a practical tool.

Stop Thinking “Brightness” as One Number
In day-to-day work, lumens and candela are not competing metrics—they describe two very different behaviors of light, and most mistakes happen when we expect one number to do both jobs.
Lumens tell you how much total light a fixture outputs. That matters when you’re filling space—washing a wall, lighting a stage evenly, or creating ambient color. But lumens say nothing about how concentrated that light is once it leaves the fixture.
Candela, on the other hand, is what you feel when a beam cuts through the air and still looks intense at 20 meters. It’s not about how much light exists—it’s about how tightly that light is packed.
In practice, this is why a compact LED Par Can with high lumen output can look fantastic for stage wash at 5–8 meters, but completely fall apart when you try to push it to the back of a ballroom. Meanwhile, a smaller mini moving head with a narrow beam and high candela will look dramatically brighter in the air—even if its total lumen output is lower.
The mistake isn’t choosing the wrong fixture. It’s expecting lumens to behave like candela.
A Simple Field Framework You Can Actually Use
Forget spec sheets—start with distance and purpose. That’s what actually determines whether a fixture works.
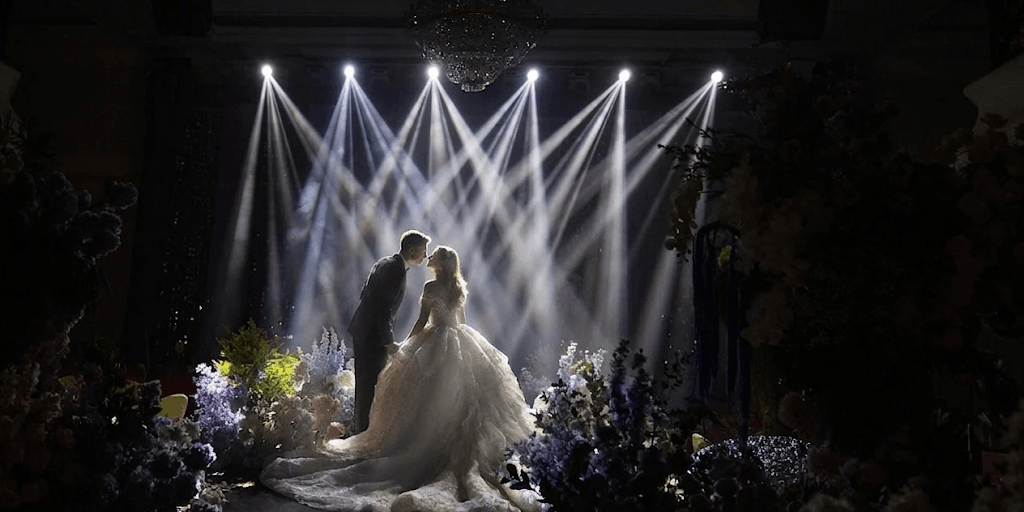
If you’re lighting a 20×15m church stage or a wedding floor, you’re solving for coverage. In that case, lumens matter more. Fixtures in the 8,000–12,000 lumen range with 30°–50° beams will give you even, usable wash. You don’t need punch—you need consistency.
But once your throw goes past 15–20 meters, lumens stop being the key factor. At that point, candela takes over. For concert stages or deep venues, anything under ~50,000 candela will start to fall apart at distance, no matter how high the lumen rating looks on paper.
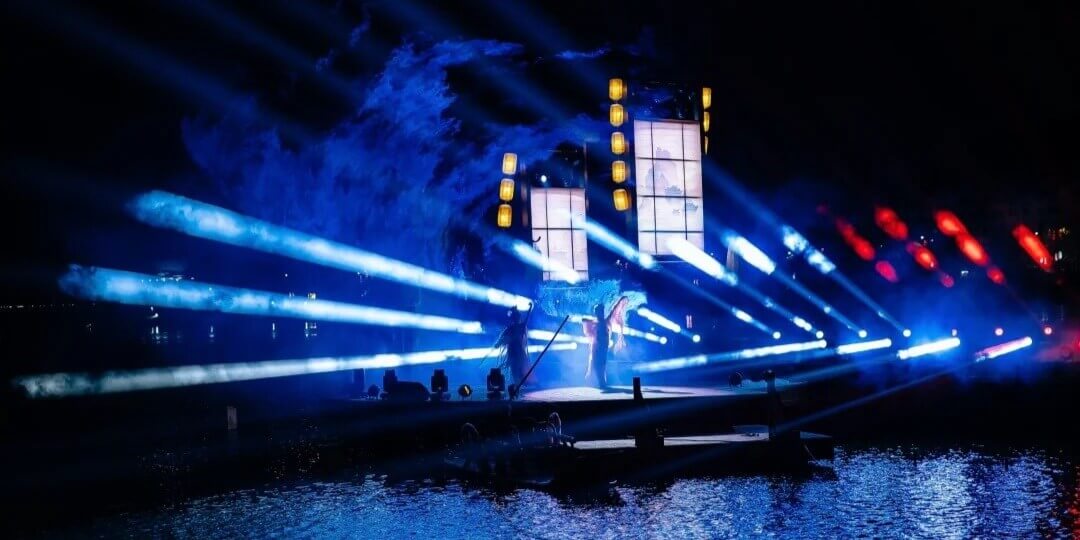
Beams in haze make this even clearer. A tight 10° fixture with ~40,000 candela will create visible, sharp shafts, while a 45° wash—even with higher lumens—just glows without structure. That’s why some rigs feel flat even though they’re “bright.”
For camera setups, there’s another layer: CRI. You can have plenty of output, but if CRI is low, skin tones and colors won’t hold up on video. In most real applications, you want CRI 90+ for anything being filmed.
The key factor behind all of this is beam angle—it’s what turns lumens into usable intensity.
Two fixtures at 10,000 lumens can behave completely differently. A 15° beam might deliver around 50,000 candela, while a 45° beam drops closer to 8,000. That’s the difference between a fixture that still reads at 20 meters and one that fades out at 8–10.
This is also where most mistakes happen. A high-lumen, wide-beam fixture looks great up close, but once you push it into a long throw, the light spreads too thin. Adding more of the same doesn’t fix it—you need a tighter beam or a higher-candela fixture.
In real systems, you’re almost always combining both roles. Wide-beam, high-lumen fixtures handle wash and coverage, while narrow-beam fixtures handle structure and distance. Once you start thinking this way, fixture selection stops being guesswork—and starts matching what actually happens in the room.

A Simple On-Site Test You Can Run Yourself
If you want to know how a fixture actually performs, you have to test it the way it will be used—not at 3 meters in a bright room.
Start with the right tools. A basic lux meter (such as Extech or Dr.Meter) is ideal, but in many real-world cases, a calibrated phone app (like Photone or Lux Light Meter Pro) is good enough for comparison. The goal isn’t laboratory accuracy—it’s consistency across fixtures.
Set your test distance to something realistic. For most applications, that means 10 meters as a baseline, and ideally 15–20 meters if you’re evaluating throw performance. This matters because light intensity drops with distance, and short-distance tests will always make weak fixtures look better than they really are.
Place the fixture at a fixed height and aim it straight at a wall or floor. Turn off ambient lighting as much as possible, and if the fixture is intended for beam use, introduce haze. Without haze, you’re not actually testing beam performance—you’re just testing spill.
Now take your measurement at the center of the beam.
At 10 meters, you can use a simple reference:
- Around 5,000–10,000 lux → usable for wash
- Around 10,000–20,000 lux → strong output
- Above 20,000 lux → high-intensity, suitable for long throw or beam effects
The exact number isn’t the point—the consistency is. If one fixture measures twice the lux of another at the same distance, it will look significantly brighter in real use.
This works because lux is what actually reaches the surface. It directly reflects what the audience or camera sees. Lumens only describe how much light leaves the fixture, but lux tells you how much of that light survives the distance. That’s why lux is the most practical performance metric on-site.
You can also use this to estimate candela indirectly. If you know the distance and measure lux, you can roughly understand intensity behavior. A fixture that maintains high lux at 15–20 meters is maintaining candela. If the lux drops off quickly, the light is being spread too wide, regardless of its lumen rating.
There are a few common mistakes to avoid. Testing at 3–5 meters will hide performance differences. Testing with ambient light on will contaminate your readings. And testing beam fixtures without haze will make low-intensity fixtures look acceptable when they’re not.
How to Read Specs Without Guessing
When you open a spec sheet, don’t start at “lumens.” Start with three things:
First, find the beam angle. This is usually listed in degrees (°).
- 10°–15° → beam / long throw
- 20°–30° → spot
- 30°–50° → wash
This tells you how the light is distributed before you even look at output.
Second, look for lux or candela.
- Candela (cd) → intensity at the source
- Lux (lx) → intensity at a distance
If you see something like “15,000 lux @ 10m,” that’s valuable. It means the fixture still delivers strong usable light at distance. If this data is missing, you’re only seeing part of the picture.
Third, check the measurement conditions.
If the spec doesn’t state distance, beam angle, or testing method, the number has limited value.
A practical guideline:
- Small venues (≤10m) → 5,000–10,000 lux is enough
- Medium venues (10–20m) → 10,000–20,000 lux
- Large venues (20m+) → 20,000 lux+ needed for visible impact
What to Ask Before You Buy (So You Don’t Get Misled)
When talking to a supplier, don’t ask “is it bright?”
Ask questions that force measurable answers.
For example:
“Can you provide lux values at 10m and 20m?”
→ If they can answer clearly, they understand real performance
→ If not, they’re relying on marketing numbers
“What is the beam angle, and how does it change with zoom?”
→ Because beam angle directly affects intensity
“Do you have real demo footage in a 20–25m space with haze?”
→ Because beam visibility can’t be judged on paper
“How does output hold after long-term use (e.g. 3,000–5,000 hours)?”
→ Because lumen maintenance affects real-world consistency
A reliable supplier will answer with numbers, conditions, and examples—not just adjectives.
Why This Matters
Once you test fixtures this way, and read specs this way, you stop relying on lumen numbers alone.
You start evaluating what actually matters:
👉 How much light reaches the target
👉 How well it holds at distance
👉 How it behaves in real space
And that’s the point where fixture selection stops being guesswork—and starts becoming predictable.
Before You Buy: How to Predict Real Throw Performance
By now, you’ve seen the pattern: some fixtures look bright at 10 meters, then disappear at 20. The problem isn’t output—it’s how that output holds over distance.
Light drops off fast. Double the distance, and what you see can feel dramatically weaker. That’s why a 15,000–20,000 lumen wash fixture with a 40° beam works well up close, but starts to lose presence past 15–20 meters. The light is still there—it’s just spread too thin.
Now compare that to a tight-beam fixture. Something with a 3°–5° beam and high candela will still hold intensity at the same distance, even with lower total lumens. That’s the difference between light that fills space—and light that cuts through it.
A good example is a beam fixture like the Betopper LB295 295W Moving Head Beam Light. It’s not about having more lumens—it’s about keeping that light concentrated so it still reads clearly at 20 meters and beyond. That’s exactly where most wide-beam fixtures start to fall off.
So before you buy, focus on three things:
- Beam angle — over 30° means wash, under 15° means real throw
- Lux at distance — this tells you what actually reaches your stage
- Real demo footage — especially in 20m+ spaces with haze
If those three aren’t clear, you’re guessing.
Once you start thinking this way, the question changes. It’s no longer “which one is brighter”—it’s “which one will still work at my distance.”
And that’s what actually matters when the rig goes up.
Final Takeaway
Lumens tell you how much light you have.
Candela tells you how far it actually works.
If your setup isn’t performing, it’s usually not a lack of output—it’s a mismatch between beam angle and distance.
Once you start judging fixtures this way, choosing the right light becomes much simpler.
If you’re planning your next setup, explore options that are built for real throw—not just high lumen numbers:
Hinterlasse einen Kommentar
Alle Kommentare werden vor der Veröffentlichung geprüft.
Diese Website ist durch hCaptcha geschützt und es gelten die allgemeinen Geschäftsbedingungen und Datenschutzbestimmungen von hCaptcha.