
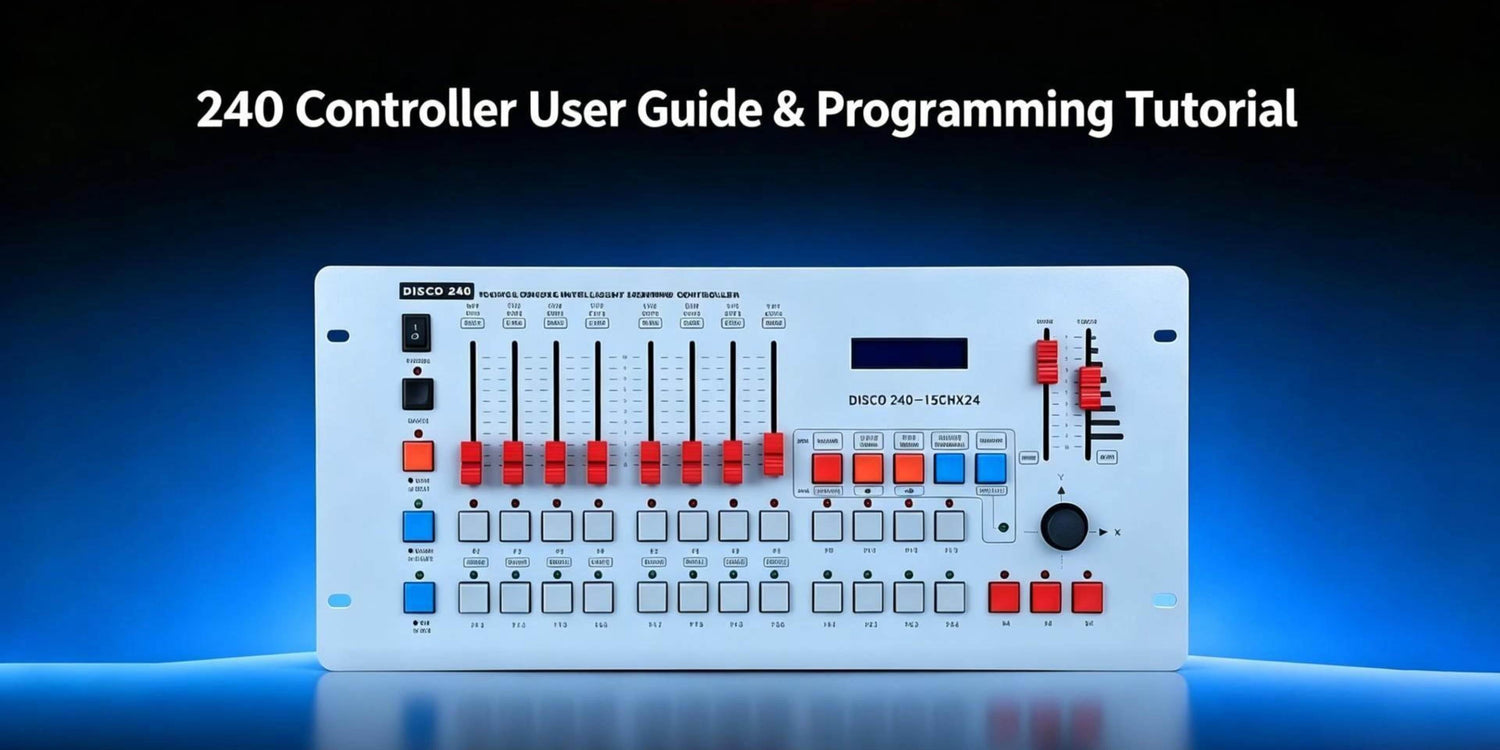
Quick Answer: How Do You Use a DMX Console 240 with Stage Lights?
To use a DMX Console 240 with compatible stage lights:
- Connect the controller’s signal output to the DMX input of the first fixture.
- Power on the controller and the connected lights.
- Set each fixture to the required DMX mode and address.
- Make sure
BLACKOUTis turned off. - Select a program position and the fixture you want to control.
- Use the eight faders to adjust the fixture’s DMX channels.
- Press the
+button to save the program. - Use the XY joystick to control the pan and tilt of a selected moving head.
The steps in this guide are demonstrated with Betopper stage lights. The exact function of each fader depends on the DMX channel chart of the connected fixture.
Watch the Official Video Tutorial
Watch the controller panel and each operation in real time:
Watch the Betopper DMX Console 240 video tutorial
Use the video together with the written guide below for easier setup and programming.

Before You Start
Prepare the following equipment:
- Betopper DMX Console 240
- One or more compatible stage lights
- Controller power supply
- Power cables for the lights
- DMX signal cables
- The user manual or DMX channel chart for each light
Connect the controller’s signal output to the DMX input of the first light. To connect additional lights, run another DMX cable from the output of the first light to the input of the next one.
Before using the controller, make sure every light is powered on and set to the required DMX mode and address.
Channel functions vary between products and DMX modes. Always check the channel chart for the exact light you are using.
1. Power On the Controller
Locate the power switch on the front panel.
Press the switch and wait for the display to light up. Once the display is active, the controller is ready for use.
Confirm that:
- The connected lights are powered on
- The DMX signal cable is connected correctly
- Each light is set to DMX mode
-
BLACKOUTis not active
2. Use the Blackout Function
The black button on the panel is the BLACKOUT button.
Press it once to stop the controller’s lighting output. The connected lights will go dark.
Press it again to exit Blackout and return to normal control.
Blackout is useful when you need to turn off all lighting output quickly without changing the current fader positions or saved program.
When a connected light remains dark, check the Blackout button before changing its address or other settings.
3. Select a Light and Control Its Functions
The 12 red buttons on the controller are used for both program storage and light selection.
In the official tutorial:
- The first press selects a program storage position
- The second press switches the button to light-selection mode
The 12 buttons correspond to 12 light positions.
After selecting a light, use the eight faders to control its DMX functions.
In the fixture demonstrated in the video:
- Fader 1 controls brightness
- Fader 2 controls red
- Fader 3 controls green
This is only the channel order of the light used in the tutorial. On another stage light, the same faders may control pan, tilt, dimmer, color, strobe, zoom, gobo, or another function.
Refer to the DMX channel chart for the exact model and channel mode you are using.
4. Save and Play a Basic Program
After selecting a light and adjusting its look with the faders, you can save the result as a basic program.
Follow the sequence shown in the official tutorial:
- Select the required program storage position.
- Switch to light-selection mode.
- Select the light you want to control.
- Adjust the faders to create the required lighting look.
- Press the
+button to save the program. - Exit programming mode.
- Press the corresponding program button to play the saved program.
For your first test, create a simple static color or fixed moving-head position. This makes it easier to confirm that the light, address, and faders are working correctly.
5. Use Sub Control for a 24-Channel Light
SUB CONTROL is used when the 12 standard light positions are already assigned and you need to control a light operating in a 24-channel mode.
In the official Betopper tutorial, Sub Control is assigned from address 218.
Because the controller has eight physical faders, the 24 channels are divided into three pages:
| Fader Page | Controlled Channels |
|---|---|
| Page 1 | Channels 1–8 |
| Page 2 | Channels 9–16 |
| Page 3 | Channels 17–24 |
To use Sub Control:
- Press
SUB CONTROL. - Use the eight faders to control Channels 1–8.
- Switch to the second page for Channels 9–16.
- Switch to the third page for Channels 17–24.
- Press
SUB CONTROLagain to exit.
Make sure the connected light is operating in the corresponding 24-channel mode before using this function.
6. Use Spot Control for Single-Channel Devices
SPOT CONTROL is designed for single-channel DMX functions and compatible auxiliary equipment.
In the official tutorial:
- Spot Control starts from channel 206
- It provides control of 12 individual channels
- Each of the 12 panel buttons controls one channel independently
The tutorial demonstrates Spot Control with a DMX-compatible smoke machine.
To use it:
- Press
SPOT CONTROL. - Press the button assigned to the required channel.
- Use the corresponding button to operate the connected DMX function or device.
- Press
SPOT CONTROLagain to exit.
The connected equipment must support DMX control. A smoke machine without a DMX input cannot be controlled through the console’s DMX output.
7. Control a Moving Head with the XY Joystick
The XY joystick controls the movement of compatible moving-head lights.
- The X-axis controls horizontal pan movement
- The Y-axis controls vertical tilt movement
To control a moving head:
- Select the moving head you want to operate.
- Move the joystick left or right to adjust pan.
- Move the joystick forward or backward to adjust tilt.
The moving head must be set to the correct DMX mode and selected on the controller before it will respond to the joystick.
8. Delete, Manage, and Lock Programs
The programming area includes controls for managing saved programs.
Delete a Program
Press and hold the DELETE button for approximately three seconds to enter program-deletion mode.
Manage Program Steps
Use the program increase and decrease controls to add, reduce, or manage steps in a multi-step program.
Lock a Function
The blue LOCK button prevents a selected program, function, or channel from being changed accidentally.
Press it once to lock the selected function. Press it again to unlock it and return to normal operation.
9. Adjust Program Speed and Timing
The panel includes two timing faders for adjusting program playback.
In the official tutorial:
- Moving a timing fader upward makes the program run faster
- Moving it downward makes the program run more slowly
Adjust the faders while watching the connected lights until the program speed and transitions match the required effect.
Quick Troubleshooting
| Problem | What to Check |
|---|---|
| A stage light does not respond | Power, Blackout, DMX cable, DMX mode, and address |
| The faders control the wrong functions | The selected channel mode and DMX channel chart |
| A moving head does not respond to the joystick | Light selection, DMX mode, and pan/tilt channels |
| Several lights respond together | Whether they are using the same DMX address |
| Only eight channels are available | Use the page control in Sub Control |
| A smoke machine does not respond | Confirm that it supports DMX input |
Frequently Asked Questions
How do I connect stage lights to a DMX Console 240?
Connect the console’s signal output to the DMX input of the first light. Power on the controller and the light, then set the light to the required DMX mode and address.
Can a DMX Console 240 control multiple stage lights?
Yes. Connect the controller to the first light, then connect the DMX output of that light to the DMX input of the next one. Continue the same daisy-chain connection for additional lights.
The lights can respond together or independently depending on their DMX addresses.
Why do the faders control the wrong colors or functions?
The light may be operating in a different DMX mode or channel layout.
Check the DMX channel chart for the exact model and selected mode. Channel assignments are not the same across all stage lights.
How do I save a program on a DMX Console 240?
Select a program storage position and the light you want to control. Adjust the faders, press the + button to save, exit programming mode, and press the corresponding program button to play the saved look.
Why do several connected lights respond at the same time?
The lights may be using the same DMX address.
Lights with the same address receive the same channel instructions. Assign different addresses when you need to control them independently.
What is the difference between Sub Control and Spot Control?
| Function | Purpose |
|---|---|
| Sub Control | Controls a 24-channel fixture through three pages of eight faders |
| Spot Control | Controls 12 individual single-channel DMX devices or channels |
In the official tutorial, Sub Control starts at address 218, while Spot Control starts at channel 206.
Why can I only access eight channels of my 24-channel fixture?
The console has eight physical channel faders, so Sub Control divides the 24 fixture channels into three pages:
- Page 1: Channels 1–8;
- Page 2: Channels 9–16;
- Page 3: Channels 17–24.
Use the page button to move between these channel groups.
Can the controller operate a smoke machine?
The smoke machine must support DMX input. A unit that only uses a wired remote cannot be controlled through the console’s DMX output unless it also includes DMX control.
Why is my Betopper light not responding to the controller?
Check the following first:
- The controller and fixture are powered on;
-
BLACKOUTis turned off; - The DMX cable is connected from the controller output to the fixture input;
- The fixture is operating in DMX mode;
- The correct fixture button is selected;
- The fixture is using the intended DMX address.
Incorrect mode, address, or cable direction causes many beginner setup problems.
Where can I find the DMX channel chart for my Betopper stage light?
Check the user manual for the exact Betopper model or visit the Betopper User Guides page.
The correct channel chart is important because channel order and available functions vary between products and DMX modes.
Learn with the Official Betopper Tutorial
For the clearest explanation, follow this guide while watching the official hands-on demonstration:
Watch the Betopper DMX Console 240 tutorial
For product specifications, availability, and ordering information, visit the official Betopper DMX Console 240 product page.
![What to Look for When Buying IP65-Rated LED PAR Lights for Outdoor Events & Backyard Gatherings [2026]](http://betopperdj.com/cdn/shop/articles/bk8.7.jpg?v=1786083692&width=2848)

Lascia un commento
Nota che i commenti devono essere approvati prima di essere pubblicati.
Questo sito è protetto da hCaptcha e applica le Norme sulla privacy e i Termini di servizio di hCaptcha.