成功した写真家や映画監督が、どのようにして被写体をクリアでプロフェッショナルな印象に仕上げているのか、知りたいと思ったことはありませんか?その答えは、3点照明です。この使いやすいシステムは、明るいキーライト、柔らかなフィルライト、そして被写体をより鮮明にし、強い影を軽減し、被写体を際立たせるバックライトの3つのライトで構成されています。
私は、セットアップ方法と、クリエイティブな使い方(DIYギアも!)と、それが真のマスターである理由を説明するガイドから始めます。 写真照明。 さあ行こう!
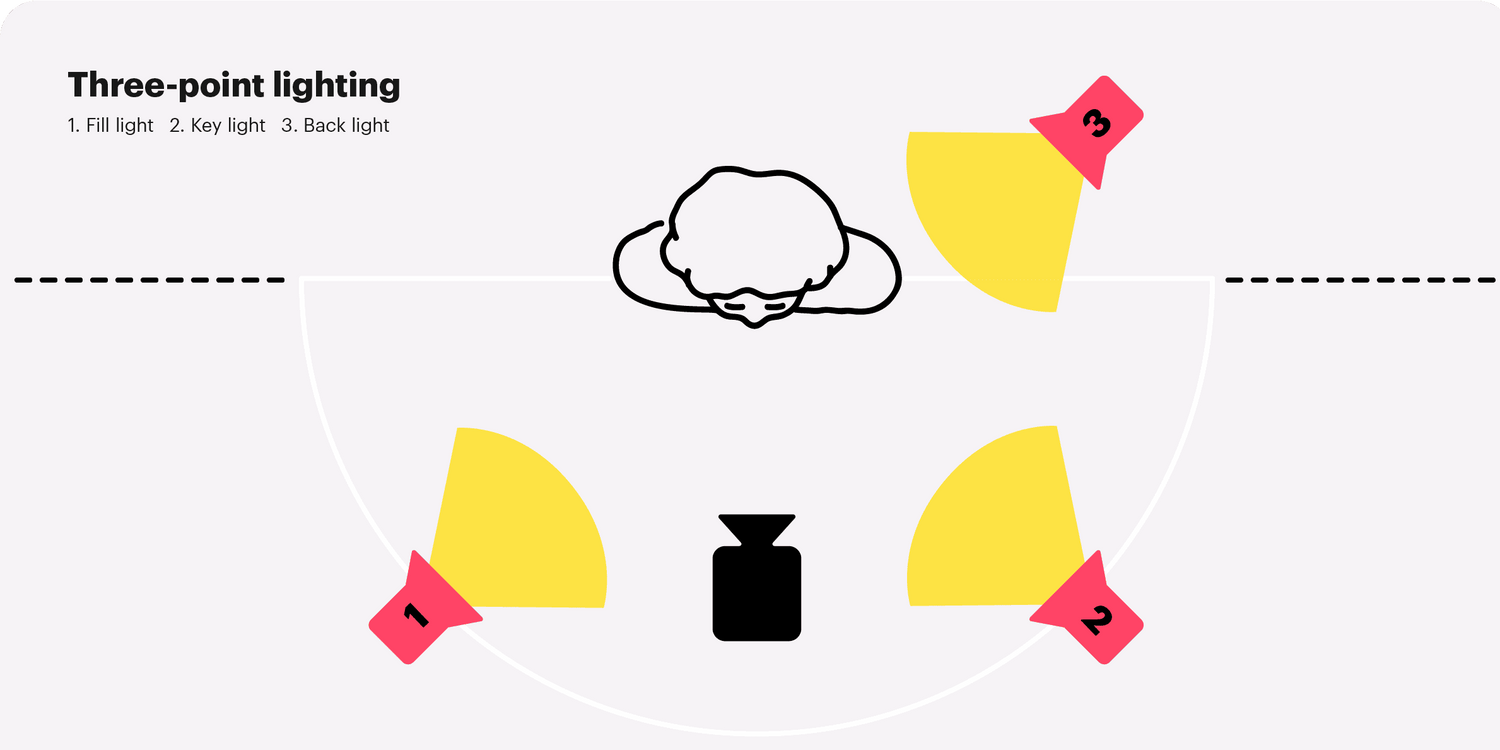
3点照明とは何ですか?
3点照明がなぜ重要なのかがわかったところで、実際にどのように機能するのかを説明しましょう。このシステムでは、それぞれ異なる役割を持つ3つのライトを使用し、被写体を洗練されたプロフェッショナルな仕上がりにします。レシピのように考えてみてください。キーライト、フィルライト、バックライトの適切な組み合わせが成功の鍵であり、毎回素晴らしい作品になること間違いなしです。

キーライト – ショーの主役
キーライトは、シーンの主な光源として照射されます。その強力な光線は被写体に連続的に照射され、通常は45度の角度で左または右前方を照らします。この照明の配置によって、シーン全体の印象が決まります。
写真の照明の例として、強力なキーライトを使用すると、強い影のあるドラマチックなポートレートを作成できますが、フレンドリーな YouTube 動画では、より柔らかい光のアプローチが使用されます。
プロのヒント: 被写体が強すぎる場合は、キーライトをさらに遠くに移動するか、ディフューザー(白い紙)を使用して光を拡散させることもできます。
フィルライト – 影を和らげる
フィルライトはあなたの助けになります。キーライトの反対側に配置され、キーライトよりも明るめの光で、キーライトによってできた影を「埋める」役割を果たします。TikTokのチュートリアル動画を撮影していると想像してみてください。フィルライトがないと、顔の半分が暗闇に消えてしまうかもしれません。フィルライトがあれば、被写体がはっきりと見え、バランスが保たれます。
おもしろい事実: 必ずしも2つ目のライトが必要なわけではありません。リフレクター(白いボール紙でも可)でキーライトの明るさを反射させ、フィルライトとして使うことができます。
バックライト – 奥行き感の秘密
バックライト(またはリムライト)は被写体の後ろ、通常は高めの位置に配置され、輪郭に輝きを与えます。まるで栗色の背景に鉛筆で描いたような印象を与え、被写体が背景から離れると、その被写体が浮かび上がるような印象を与えます。
3 点照明システムでは、バックライトを省略すると、ビデオが実際の人物ではなく、段ボールの切り抜きのように平坦に見えてしまうことがあります。
例: ストリーマーはグリーン スクリーンに対して目立つようにバックライトを使用し、写真家は屋外での撮影にドラマチックな演出を加えるためにバックライトを使用します。
3ポイントシステムの仕組み
3点照明システムは、照明を戦略的にバランスよく配置することで、奥行き、立体感、そして視覚的な明瞭さを生み出すため、効果的です。キーライト、フィルライト、バックライトという3つの主要な光源で構成され、それぞれが被写体の外観を形作る上で異なる役割を果たします。
- キーライト – これは主な光源であり、最も強い照明を提供し、被写体の形状と質感を定義します。
- フィルライト – キーライトの反対側に配置することでコントラストを抑え、影を柔らかくし、自然でバランスの取れた外観を実現します。
- バックライト – 被写体の後ろに配置されたこのライトは、被写体を背景から分離し、奥行きを加え、平坦な外観を防ぎます。
これらのライトの強度と位置を調整することで、さまざまな効果を実現できます。
- 高コントラストのドラマ → 強いキー+弱いフィル+明確なバックライト
- 柔らかく自然な → 中程度のキー + 拡散フィル + 優しいバックライト
- インタビューに最適 → 明るいキー + ソフトフィル + 微妙なバックライト
このシステムは、被写体が平坦に見えたり過度に影になったりすることなく、バランスのとれたプロフェッショナルな外観を作り出すため、写真撮影、ビデオ撮影、舞台照明のあらゆる場面で機能します。
3点照明システムの設置方法
3点照明の基本原理を学んだら、いよいよ照明を配置してみましょう!3点照明のセットアップは最初は複雑に見えるかもしれませんが、これらの手順に従うことで、一般的な問題を回避し、安価な機材でもプロレベルの成果を上げることができます。

ステップバイステップの3ポイント照明設定ガイド
- キーライトの位置
最も明るいライト(キーライト)をモデルに対して45度の角度で当て、目の少し上に置くことで、最高の仕上がりになります。この光は窓や太陽光からの自然光のようにモデルの顔に当たるため、撮影中の快適さを保ちます。
- フィルライトを追加する
キーライトとは対照的に、もう一方のエリアに薄暗い照明を配置します。薄暗い照明は、キーライトに比べて明るさが半分程度に抑えられているように見えます。この効果を得るには、照明を暗くするか、後ろの壁に貼り付けましょう。(カーテンや白い布を使うと、より自然な暗さになります。)こうすることで、照明が過剰に当たることなく、影が柔らかくなります。
- バックライトを設定する
被写体の後ろにバックライトを置き、顔と肩を照らします。その周囲がランプで照らされている場合は、追加のスツールを用意し、ランプの上に置きます。
光の強さと距離を調整する
すべての照明が常に同じ明るさであるとは限りません。モデルに直接当たる光を遮る拡散板(シート、カーテンなど)を設置したり、反射板(板、塗料など)を使って光を捉え、影を柔らかくしたりすることで、強い影を和らげましょう。例えば:
- ドラマチックな影を作るには、キーライトを近づけます。
- 自然な外観にするために、フィルライトを壁に反射させます。
- レンズフレアを避けるためにバックライトの角度を高くします。
注意: 被写体が色あせて見える場合は、キーライトを暗くするか、キーライトを後ろに移動してください。
避けるべきよくある間違い
- 逆光を避ける:逆光だと被写体が背景に溶け込んでしまいます。背後に小さなデスクランプを置くだけでも効果的です。
- 間違った角度:照明の位置が高すぎたり低すぎたりすると、見栄えの悪い影(「タヌキの目」のような)ができてしまいます。照明は目の高さに保ちましょう。
- 複雑になりすぎないように、まずはシンプルに始めましょう。高価な機材は必要ありません。家庭用のランプで基本的な3点照明システムを構築できます。
3点照明と4点照明
3つのライトでは足りない場合はどうすればいいでしょうか?両方のシステムを比較し、アップグレードのタイミングを見ていきましょう。3点照明と4点照明はどちらも写真撮影、ビデオ撮影、そして 舞台照明しかし、それらは異なる目的を果たします。
3点照明 キーライト、フィルライト、バックライトで構成されており、奥行きを作り出し、強い影を軽減するため、インタビュー、ポートレート、一般的な撮影に最適です。
4点照明 この設定に、 背景光これにより、シーンの分離が強化され、背景の照明をより細かく制御できるようになるため、グリーン スクリーン、映画のような効果、ドラマチックなストーリーテリングに特に役立ちます。
3点照明と4点照明の比較
| 特徴 | 3点照明 | 4点照明 |
|---|---|---|
| 主要コンポーネント | キーライト、フィルライト、バックライト | キーライト、フィルライト、バックライト、バックグラウンドライト |
| 目的 | 奥行き感を演出し、影を最小限に抑えます | 奥行きを強調し、背景の照明をコントロールします |
| 最適な用途 | インタビュー、ポートレート、基本的なビデオ制作 | 映画のシーン、グリーンスクリーン、舞台効果 |
| シャドウコントロール | バランスは取れているが周囲の光に依存 | 背景光の追加により、より洗練された |
| 背景の可視性 | 被写体の照明の影響を受ける可能性がある | 背景照明の独立制御 |
| 複雑 | シンプルで広く使われている | 少し複雑だが、制御が強化されている |
追加の照明は、ケーブル、セットアップ時間、そしてコストの増加につながることにご注意ください。これらの2つのセットアップから選択することで、クリエイターは特定の制作ニーズに合わせて照明を調整し、被写体と背景を効果的に照らし、望ましい視覚効果を実現できます。
三点照明の創造的な応用
インタビューやスタジオのセットアップでの標準的な使用を超えて、3 点照明はさまざまな分野で創造的な表現を行う多目的ツールとして機能します。
ポートレート写真の照明テクニック
ポートレート写真では、三点照明は被写体の特徴を際立たせ、画像に奥行きを与えるのに役立ちます。 ソフトキーライト 魅力的な見た目を演出し、 フィルライト コントラストを調整して影のディテールを維持します。 バックライト 分離には不可欠であり、被写体に次元感を与えます。
レンブラント照明(ドラマチックな影を使用)やハイキー設定(明るくきれいな効果のために影を最小限に抑える)などのバリエーションは、さまざまな芸術スタイルを実現するこのテクニックの適応性をさらに示しています。
映画における3点照明
映画制作において、三点照明は雰囲気をコントロールし、観客の焦点を導くために不可欠です。 高コントラスト設定 支配的なキーライトと最小限のフィルライトにより、ノワール映画でよく見られるドラマチックでサスペンスに満ちた効果が生まれます。
逆に、 柔らかく均一に分散された照明 このセットアップは、ドラマや恋愛映画でよく使用される、自然で臨場感あふれるシーンを実現します。
監督や撮影監督は、これらの要素を操作してストーリーテリングを強化し、影やハイライトを使用して感情を呼び起こし、シーン内のキャラクターの存在を定義します。
光の比率のバランスをとるためのベストプラクティス
ライト間の適切なバランスを取ることは、完璧なレシピを作るための材料を混ぜ合わせるようなものです。キーライトとフィルライトの比率を調整することでシーンがどのように変化するか、そしてバックライトが奥行き感を生み出す秘密兵器である理由を探ってみましょう。
キーライトとフィルライトの比率(2:1 vs. 4:1)
2:1の比率(キーライトの明るさがフィルライトの2倍)で、柔らかく自然な影を作り出します。親しみやすく親しみやすい印象を与えたいインタビューやYouTube動画に最適です。たとえば、明るいキーライトを 45 度で配置し、リフレクターをフィルライトとして使用して、光を穏やかに反射させます。
4:1の比率(キーライトの明るさを4倍にする)でドラマチックな効果が得られます。ムーディーなミュージックビデオや映画のようなショットを思い浮かべてみてください。フィルライトは影にほとんど触れず、顔の半分は暗くなっています。ホラーシーンや芸術的なポートレートなどにお試しください。
プロのヒント: 明るさのレベルを測定するには、露出計アプリ (スマートフォンでは無料) を使用します。
バックライトで奥行き感を出す
バックライトを使うと、被写体が平面的に見えてしまうのを防ぐことができます。被写体の後ろ、少し上方から肩下に向けて照射しましょう。屋外撮影の場合は、太陽光を模した角度で照射しましょう。屋内では、小型のLEDパネルやデスクランプなどを使うのも良いでしょう。
例: 製品ビデオでは、微妙なバックライトが花瓶を暗い背景から切り離し、追加の編集なしで「目立つ」ようにします。
予算に優しい3点照明ソリューション
3点照明を完璧に実現するのに高価な機材は必要ありません。DIYのコツとお財布に優しい機材を使って、低予算でプロ仕様のセットアップを構築する方法をご紹介します。
DIYの代替品
高価な機器を購入する代わりに、家庭用品を照明ツールに変える方法を検討してください。
- キーライト: 白いシャワーカーテンをディフューザーとして使ったクランプライトを使用します。
- フィルライト: 白い壁またはフォームボードに太陽光またはランプを反射します。
- バックライト: LED フェアリー ライトのストリングや小さなベッドサイド ランプを再利用します。
ケーススタディ: ある YouTuber が、窓をキーライトとして、アルミホイルをフィルリフレクターとして、そして 10 ドルの LED ストリングライトをバックライトとして使用して料理のチュートリアルを撮影しました。
おすすめの予算ギア

信頼性が高く手頃な価格のオプションについては、
1. 鮮やかでカスタマイズ可能な3点照明のセットアップには、
2. 優れた色精度を備えた高CRI照明を実現するため、
これらが機能する理由: 静かでエネルギー効率が高く、ほとんどの DIY セットアップと互換性があります。
最後に
3点照明はプロだけのものではなく、誰でも使いこなせる万能ツールです。スキット撮影、ゲーム配信、商品写真の撮影など、キーライト、フィルライト、バックライトのバランスが、撮影の大きな違いを生みます。
家庭用品や安価な機器を使ったシンプルな3点照明システムから始めましょう。
レベルアップする準備はできましたか?ランプを手に取り、影を操り、3 点照明が作品にどのような変化をもたらすかを見てみましょう。
よくある質問
3つの照明ルールとは何ですか?
3ライティングルールとは、キーライト、フィルライト、バックライトの3つの光を使って奥行きとバランスを作り出すことを指します。被写体に十分な光が当たり、影がコントロールされ、背景が分離していることを保証するプロセスです。この概念は、写真とビデオ撮影の基礎となっています。
三点照明の原理は何ですか?
三点照明の原則は、光の位置、光の強さのコントロール、そして影の使い方を重視します。被写体を照らすメインライト、影を柔らかくするフィルライト、そして奥行きを与えるバックライトは、写真の3つのレイヤーを構成します。これらを組み合わせることで、写真に求める雰囲気を確実に作り出すことができます。
さまざまな雰囲気に合わせてキーライトを設定するにはどうすればよいですか?
ニュートラルなシーンにはキーライトを45度に調整します。ドラマチックな演出には高めに、ソフトな雰囲気には低めに調整します。サスペンス演出には弱めのフィルライト(4:1の比率)を、明るく親しみやすいコンテンツには強めのフィルライト(2:1)を組み合わせます。
照明の黄金律とは何ですか?
黄金律は、フラットな照明を避けることです。奥行きを出すために、必ず少なくとも2つの照明(キーライトとフィルライト)を使いましょう。3つの照明(バックライトを含む)を使うと、被写体が背景から際立ち、ビジュアルが格段に引き立ちます。
3点照明の理想的な比率はどれくらいですか?
インタビューやチュートリアルには2:1(キーの明るさをフィルの明るさの2倍)が適しています。映画のようなシーンには4:1(キーの明るさを4倍)が適しています。正確な明るさを求める場合は、露出計アプリで明るさを測定しましょう。
コメントを残してください
全てのコメントは、掲載前にモデレートされます
このサイトはhCaptchaによって保護されており、hCaptchaプライバシーポリシーおよび利用規約が適用されます。