Introduction
A paid DJ gig is different from playing music at home or showing up to a casual party.
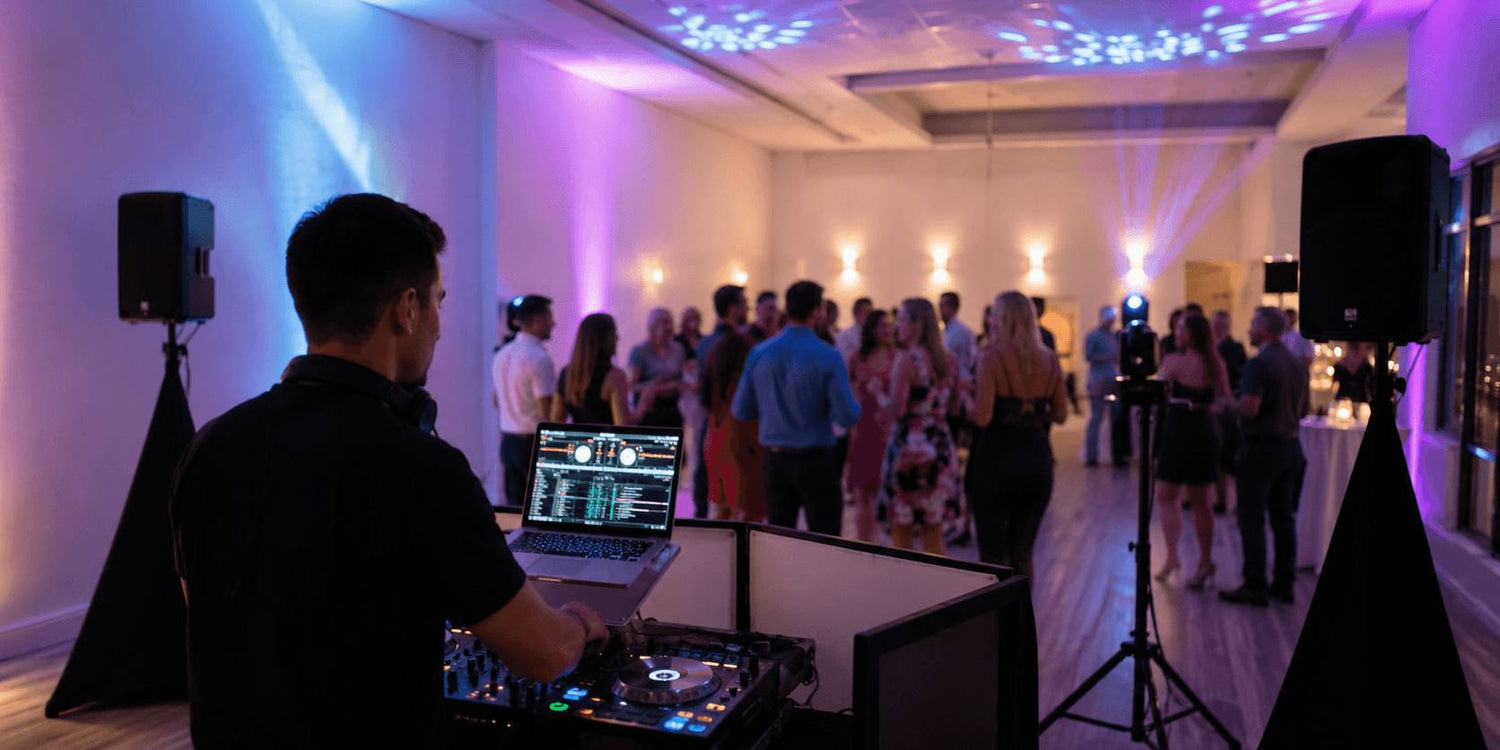
The client is not only paying for your playlist. They are paying for a setup that sounds clear, looks organized, starts on time and keeps running without obvious problems.
That does not mean you need a huge system. In fact, for smaller events, a simple setup is often better. The real difference is whether each part of the setup has been planned: the speakers cover the room, the microphone works when someone needs to speak, the lighting makes the space feel like an event, the power is not overloaded, and there is a backup plan if something fails.
This checklist is built around the parts of a paid event that people actually notice:
- Can guests hear the music and announcements clearly?
- Does the DJ area or dance floor look intentional?
- Are cables, power strips and stands placed safely?
- Is there a backup if the microphone, music source or lighting control fails?
- Has the full setup been tested before guests arrive?
You do not need to bring the biggest setup you own. You need to bring a setup you can place quickly, power safely, control confidently and fix fast if something goes wrong.

1. Confirm the Event Before Building the Setup
Before packing gear, confirm what the event actually requires.
Not every DJ event needs the same setup. A birthday party, bar night, school event and wedding reception may all require music, but the room size, sound needs, lighting expectations and setup time can be completely different. but the setup can be very different. The mistake is assuming that one standard gear list fits every job.
Ask these questions before the event day:
- How many guests are expected?
- Is the event indoors or outdoors?
- How large is the room or dance floor?
- Will there be speeches or announcements?
- Does the client expect dance-floor lighting?
- Is fog or haze allowed in the venue?
- Where will the DJ table or booth be placed?
- Where are the nearest power outlets?
- How early can you load in?
- How much time do you have for setup and testing?
These answers decide what you bring.
If there are speeches, you need a microphone plan. If the room is wide or crowded, speaker placement matters. If the client expects a party atmosphere, lighting should be planned before arrival. If setup time is short, do not bring a rig that takes an hour to cable and troubleshoot.
2. Build a Sound Setup That Covers the Room
Sound is the part guests notice fastest when something is wrong.
The music does not need to be painfully loud, but it does need to be clear across the main listening area. If the speakers are too low, the front row may block the sound. If they are placed too close to walls or corners, the room can become muddy. If they only point at the dance floor, announcements may be hard to hear from the back of the room.
Before the event starts, test the sound from different positions, not only from behind the DJ table.
Walk to the back of the room.
Stand near the side walls.
Test both music and microphone volume.
Listen for distortion, weak vocals, harsh highs or too much bass.
If the event includes speeches, announcements, introductions or games, the microphone matters as much as the music. A wireless microphone is convenient, but it should not be the only option. Batteries die. Signals drop. Guests may hold the mic too far from their mouth.
A wired backup microphone is one of the simplest pieces of gear that can save the event.
A practical sound setup should include:
- Main speakers matched to the room size
- Stable speaker stands
- A microphone for speeches or announcements
- A wired backup mic
- Tested audio cables
- Spare XLR, RCA or 1/4-inch cables based on your system
- A backup way to play music if the main source fails
The goal is simple: music should feel full, and every important spoken moment should be easy to hear.
3. Make the Space Look Like an Event
Lighting should make the room feel prepared, not random.
For a DJ event, the lighting setup needs to support the space in a few clear ways: it should make the DJ booth look intentional, give the dance area visual energy, add color to plain walls or background areas, and create different looks for different parts of the event.
Before choosing fixtures, decide what visual jobs the lighting needs to handle:
- Atmosphere: adding color to walls, corners or background areas
- Booth presence: making the DJ position look like part of the event
- Dance-floor energy: adding movement, beams or rhythm-based effects
- Scene control: switching between calmer looks and high-energy moments
- Visual depth: preventing the room from looking flat or unfinished
Once those jobs are clear, the setup becomes easier to plan.
PAR lights or wash lights can handle background color and room atmosphere. Compact moving heads can add movement and energy to the dance area. A hybrid moving head can add beam, spot or gobo effects when the event needs a stronger visual impact. A simple DMX controller can help keep scene changes clean instead of relying on random looks all night.
For Betopper users, a practical small-event setup could start with wash or PAR lights for color, then add compact moving heads for movement when the event needs more energy. The point is not to bring more fixtures. The point is to make every fixture serve a clear role in the room.
The better question is not “how many lights should I bring?”
The better question is: what should the lighting do for this event?
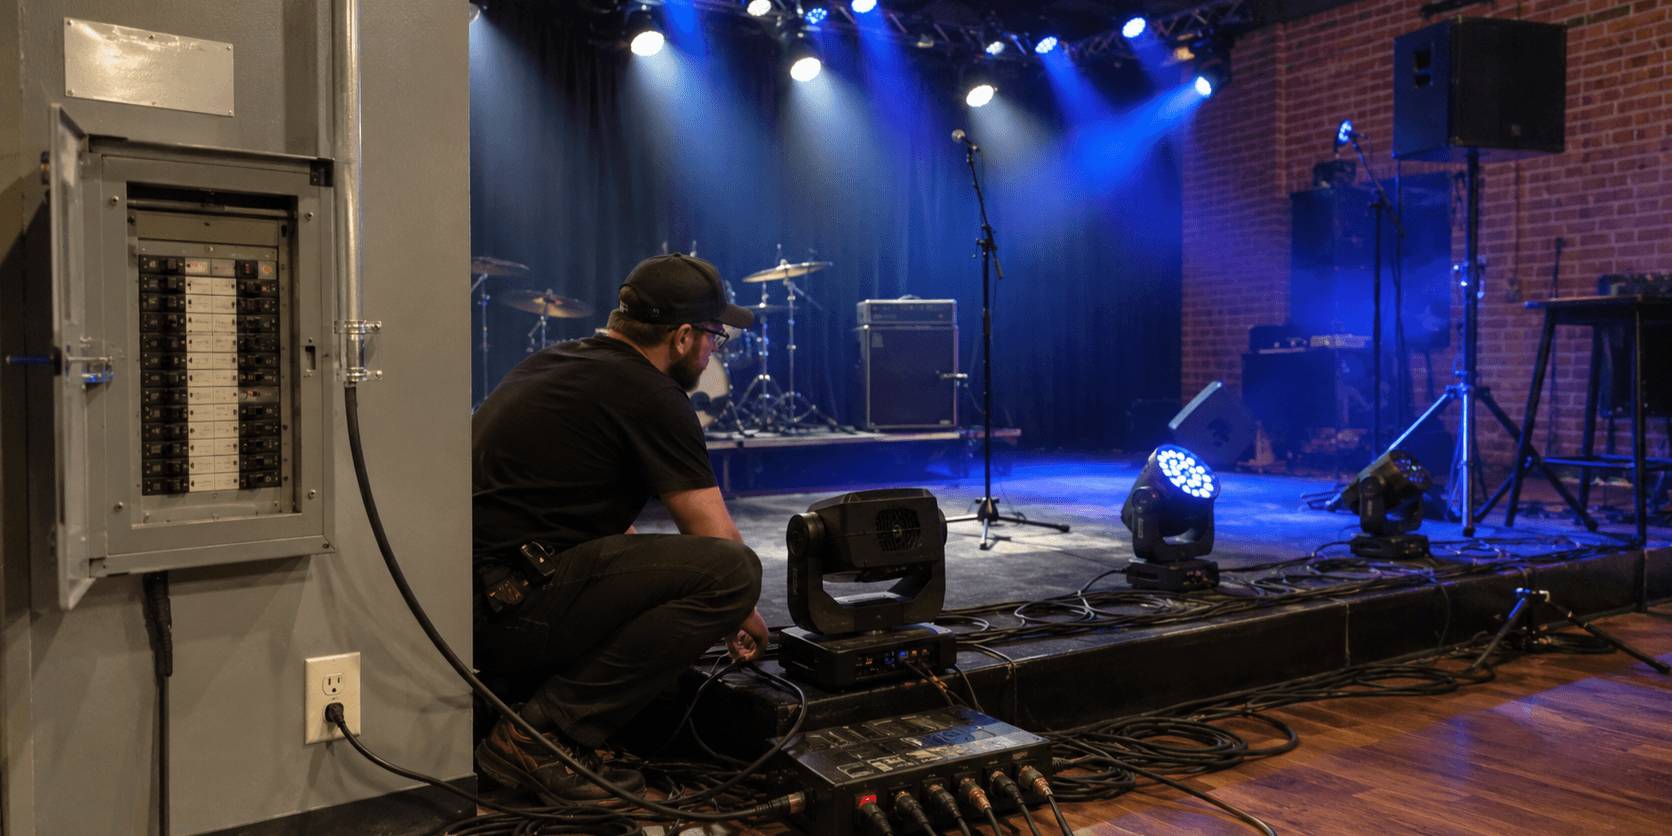
4. Plan Power Before You Plug In
Power problems can ruin a setup even when the sound and lighting are prepared well.
Before the event, find out where the power outlets are and what equipment will share the same circuit. Do not assume that two wall outlets always mean two separate circuits. In homes, bars, community rooms and small venues, several outlets may be connected to the same breaker.
For a DJ setup, the power load is not only the lighting. It may also include powered speakers, subwoofers, laptops, controllers, chargers, fog or haze machines, TVs, projectors, refrigerators or other venue equipment.
That is why power planning should happen before setup day.
Check these points:
- Where are the closest outlets to the DJ area?
- Are the outlets on the same circuit or separate circuits?
- What else is already using power in the room?
- Will you use a fog or haze machine?
- Are your extension cords and power strips rated for the load?
- Can lighting and audio be separated if needed?
Fog machines, haze machines and heating-based equipment need extra attention because they can draw more power than many LED fixtures. If they share the same circuit with speakers and lighting, the breaker may trip when everything runs together.
Avoid connecting multiple power strips together. Avoid damaged extension cords. Keep power cables away from guest walkways when possible, and tape or cover cables that must cross traffic areas.
A simple rule is useful here:
Do not let the first full-power test happen after guests arrive.
Run the complete setup before the event starts: music, microphone, lights and any fog or haze effects. If something trips, overheats or behaves strangely during testing, reduce the load or ask the venue for a safer power option.
5. Pack Backup Gear for the Problems People Notice
Backup gear is not about carrying a second version of everything. It is about protecting the parts of the event that guests will notice immediately if they fail.
Think in failure scenarios.
If the music stops, you need a backup way to keep audio playing. That may mean a spare USB drive, an offline playlist, a second laptop, or a phone or tablet with the right cable to connect into your mixer or speaker system.
If the microphone fails, you need a simple replacement. A wired microphone, spare batteries and an extra XLR cable can solve many problems faster than trying to troubleshoot a wireless system during the event.
If the lighting control fails, the room should not go completely dark or chaotic. Know how to switch your lights into a simple auto, sound-active or static color mode. Bring spare DMX cables and power cables for the fixtures you rely on most.
If the setup becomes messy, small tools matter. Gaffer tape, cable ties, a flashlight, labels and a basic tool kit can help you fix problems quickly without making the setup look unprepared.
A useful backup kit may include:
- Spare USB drive or backup music source
- Offline playlist
- Phone or tablet audio adapter
- Spare laptop charger
- Wired microphone
- Spare microphone batteries
- Extra XLR, RCA or 1/4-inch cables
- Spare DMX cable
- Spare IEC or power cable
- Gaffer tape and cable ties
- Flashlight
- Basic tool kit
The point is not to prepare for every possible failure. The point is to cover the failures that would stop the music, silence the microphone, kill the lighting or make the setup look unsafe.

6. Run a 30-Minute Pre-Show Check
The final check should happen before guests enter the room, not after the event has already started.
A 30-minute pre-show check gives you time to find problems while they are still easy to fix. Do not only check whether the controller turns on. Test the parts of the setup that will actually be used during the event.
Start with sound.
Play a track through the main system and walk the room. Listen from the back, the sides and the dance area. Then test the microphone at real speaking volume. If the event includes announcements, speeches or introductions, make sure voices are clear before the room gets busy.
Then check lighting.
Run the looks you plan to use during the event: arrival, background, dance floor and high-energy moments. Make sure fixtures respond correctly, scenes are not too bright for the room, and no light is aimed directly into guests’ eyes.
Next, check power and cables.
Look for loose plugs, overloaded power strips, warm adapters, exposed cable runs or trip hazards near guest areas. If cables cross a walkway, tape them down or reroute them before the event starts.
Finally, check your backup plan.
Make sure backup music is ready, the wired microphone is accessible, spare cables are easy to find, and your lights can switch to a basic fallback mode if control fails.
A good pre-show check should answer four questions:
- Can people hear clearly?
- Does the room look prepared?
- Is the power setup stable?
- Can you recover quickly if something fails?
If the answer is yes, the setup is ready to work.
Final 15-Minute Check Before Guests Arrive
Before guests enter the room, run one final check using the real event setup.
- Play music through the main speakers and listen from the back of the room.
- Test the microphone at normal speaking volume.
- Run your main lighting looks: arrival, background, dance floor and peak moment.
- Check that cables are not loose, exposed or crossing guest walkways.
- Make sure power strips, plugs and adapters are not warm.
- Keep backup music, a wired microphone and spare cables within reach.
- Confirm the first playlist, first announcement or first scheduled moment with the client or venue contact.
This final check should not take long. It simply confirms that the system you planned is ready before the room fills with people.
Final Advice: Build a Setup You Can Repeat
A first paid DJ gig does not need the biggest sound system or the most complex lighting rig.
It needs a setup you can repeat with confidence.
The sound should cover the room.
The lighting should make the space feel like an event.
The power plan should be checked before everything is plugged in.
The backup gear should cover the problems that would stop the show.
Once you have a reliable basic system, you can upgrade it step by step: better lighting control, stronger dance-floor effects, cleaner booth design, more flexible fixtures or a more polished cable and power setup.
Need help building a practical lighting setup for DJ gigs, parties or small events?
Explore Betopper lighting solutions here:
https://betopperdj.com/pages/lighting-solution

Laisser un commentaire
Tous les commentaires sont modérés avant d'être publiés.
Ce site est protégé par hCaptcha, et la Politique de confidentialité et les Conditions de service de hCaptcha s’appliquent.